- Jun 13, 2019
Lens Distortion: What Every Photographer Should Know
- Jen Bacher
- 0 comments
Ever wondered why your subjects look disproportioned in certain images compared to real life? Or why buildings look like they are tipping? Chances are it’s due to lens distortion. And no matter how expensive your lens, all have some distortion. The good news is it’s usually fixable in post processing and can even be desirable!
Lens distortion is an important factor to be aware of in the photography world. Different lenses cause this distortion to try to be able to fit more in the frame. Side note a 35mm is going to be your best lens to have to be able to fit more in the frame without lens distortion. I digress.
It can make or break our images as artists, depending on the look and feel we are trying to achieve. Today I’ll explain what distortion is, why it’s good or bad, and how to correct it in post processing if needed.
This post contains affiliate links. Thank you for supporting Click it Up a Notch.
What is lens distortion?
In a nutshell, it’s when a lens produces curved lines where straight lines should be. The two most common types of lens distortion are barrel distortion and pincushion distortion.

Barrel distortion is where straight lines bend outward from the center of the image.
Wide-angle prime lenses such as a 20mm lens or zoom lenses like my Nikon 24-70mm shot at its wide end typically produce images with barrel distortion because they have a wide field of view.
Interested in seeing a lens comparison? Read here!
You will most often notice distortion in architectural images where the lines of the buildings bow outward, away from the center of the image. In portraits, it can make subjects look pudgy or large-headed in comparison to the rest of their body.

Examples of wide-angle lens distortion
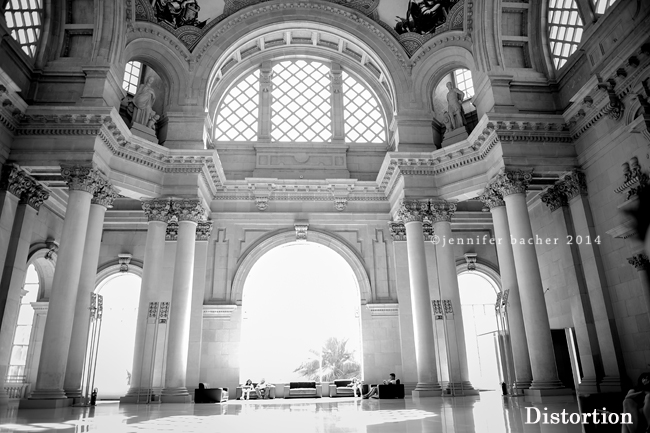
Here’s an architectural image I took in Barcelona last summer. If you look closely at the pillars in the first one, they are slanted. The second image is after the distortion was corrected in Lightroom. You will notice the pillars are straightened in the second image.

Here’s another example. Notice the curved gates, wall, and the temple in the background that seems to be leaning backwards slightly.


I actually liked the original distorted version of this photo better because after I made corrections it cropped his feet out, which bothered me more than the curved lines. It’s always your call as the artist on what you want to fix/change!
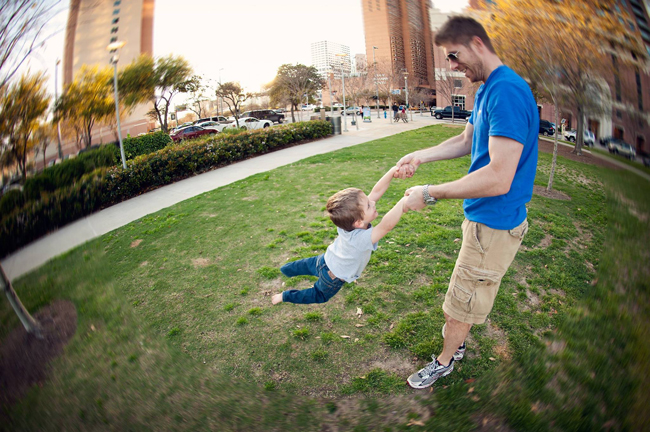
Barrel distortion will also occur if you are standing too close to your subject with a wide angle lens or a zoom lens at the wide end (ie. 24mm). Whatever body part is closest to the camera, it will look abnormally large! Heads, eyes, noses or limbs will look pronounced and awkward. This is why it’s not usually a good idea to shoot portraits with a wide-angle lens! The best focal length for portraits is 50mm and above when trying to avoid distortion.
Here’s a portrait comparison using my 24-70mm lens shot at different focal lengths, standing about the same distance from my son. Notice how odd his head looks at 24mm vs. 55 mm. And how small the rest of his body looks compared to his head.

Pincushion distortion is where straight lines bend or “pinch” inward from the center of the image.
Usually pincushion distortion happens at the telephoto end (ie. 200mm) of a zoom lens such as a 70-200mm lens. It can actually be great for portraits because it can make people look thinner than they are! You will most likely notice pincushion distortion in images with straight lines. The further the lines are away from the center of the image, the more noticeable the distortion will be. Here’s an example. The roof top of Caesar’s Palace in Vegas…

When is distortion a good thing?
Distortion can be fun! The previous image of Caesar’s Palace would have been quite boring with a straight roof. Don’t you agree? I intentionally chose distortion by shooting wide at 24mm, and placing the roofline towards the top 1/3 of the image, which curved the line.
Other examples of intentional distortion is when you want to to portray humor or a feeling that your subjects are coming at you as a viewer.

Or when you want to create a unique perspective. I shot this next image a couple of years ago of my baby eating. I wanted the viewer to feel my perspective as I was feeding him. Notice his hand and head/eyes are slightly larger than normal, but it adds to the feeling of the image.

A fish-eye lens is also a great way to practice intentional distortion. My talented friend Kelly Garvey, using her 16mm f/2.8 fish-eye lens, shot these images.
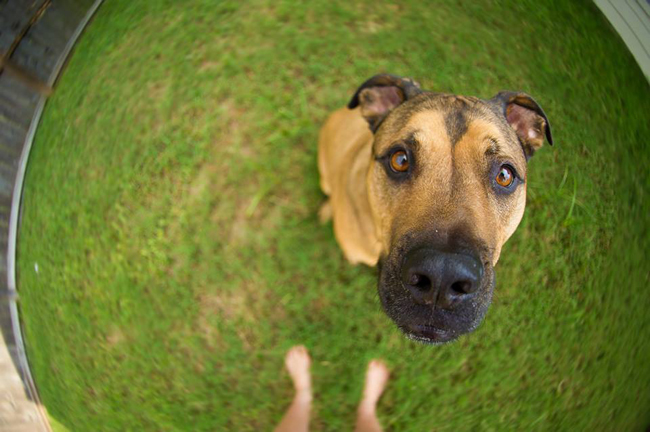
It’s can be an artistic decision whether or not you want to incorporate the look of distortion into your images!
How to correct distortion in Lightroom?
Most of the time I don’t realize I have distortion problems until I pull up my images in post processing. And usually I don’t want it there! You will find that distortion appears in many images containing windows and door frames. If you train your eye to spot the distortion in0-camera, as you shoot, you will save yourself some time fixing it later. Sometimes by simply scooting back or changing the plane of your camera in relation to your subject you can alleviate some distortion. Move higher, lower, to the side, or change your focal length until you have the look you are going for. If there’s no way to avoid it, and you don’t like the look of distortion in your images, here’s how to fix it in Lightroom and Photoshop…
Lightroom
Under the Develop module, and Lens Corrections tab, check “Enable Profile Corrections” then experiment with choosing either auto, level, vertical, or full. Usually if I’m trying to correct lines I will choose vertical.

If you want to fine tune your corrections you can click on the Manual tab under Lens Corrections where you can experiment with the different sliders to get your desired results. Also note, sometimes when making a lot of corrections you will need to re-crop the image because the changes will pull the sides of the image inward. I try to shoot with plenty of room on the sides when I know there will be distortion so I have room to crop afterwards. This is also a good reason to shoot in raw…so you have more pixels to work with if you need to crop after fixing distortion.
Photoshop
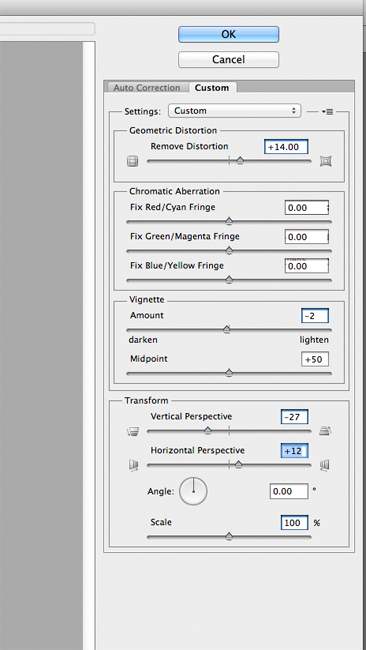
I use Photoshop CS5, but these options should be the same in more recent versions as well. Under Filter>>Lens Corrections you should see some of the same options as Lightroom where you can auto correct or go under >>Custom to fine tune. With the image below I experimented with vertical and horizontal perspective until the wall looked upright.
Sometimes Lightroom does a better job at fixing distortion than Photoshop, or vice versa. I tend to do all my adjustments in Lightroom because I prefer the results I get over Photoshop. But feel free to experiment! Here’s the before and after of an image I shot in Spain. I corrected the leaning wall so it didn’t appear to be falling!


Hope this post helped explain lens distortion and the importance it plays in your images! Please share your thoughts or questions in the comments if you have them!
The post Lens Distortion: What Every Photographer Should Know appeared first on Click it Up a Notch®.