- Sep 26, 2019
How to Use the Expodisc to Perfect Your White Balance
- Jen Bacher
- 0 comments
The Expodisc, and it has changed my photography life! It’s a tool for creating custom white balance and has helped the color tones in my images be the best they can be in the quickest time possible.
This post contains affiliate links. Thank you in advance if you make a purchase and support Click it Up a Notch®.
Tired of dealing with inconsistent skin tones and wonky colorcasts in your images? Frustrated with guessing what tones look correct in your post processing and not being totally satisfied with the results of auto white balance? I was too! Once I learned how to use the Expodisc I discovered how much I absolutely loved it. And it saved me so much extra time in post processing.
What is an Expodisc?
The expodisc is used in place of a white card or other custom white balance meter, which measures the temperature of the light reflected from the subject. Rather, it acts as an incident meter, which measures the light falling on (incident to) the subject.
How the Expodisc works
It is better than a flat white or gray card because it measures and balances the light coming from all angles surrounding your subject. Measuring with a white or gray card can differ depending on the angle in which it’s held and the light that is hitting it. A gray card works fine for shooting flat objects or art. An Expodisc is useful for 3-D subjects such as people.
Some of you may correct your white in Lightroom or Photoshop using your eyedropper tool. This works fine only if you have a neutral gray or white in your image to sample.
When should I use it?
It’s most useful when shooting in difficult lighting such as indoor, yellowy tungsten light or rooms with colored walls and/or varying colors being reflected through windows. You can also use it for shooting in highly reflective/contrasty situations with extreme lights and darks, like a white bridal gown and black tux.
Another example, outdoors in the snow when the blue reflected sky makes the white snow look bluish. Or when shooting a bride with a white dress that is taking on hues from the blue sky or green grass. If you desire a whiter white and the Expodisc get the whites truer to what my eye sees.
It also comes in handy when shooting in shade if you have color casts from the grass or in backlight when the light is super orange. In a nut shell, it neutralizes all those wonky colors and provides a balanced starting point for your images.
When do I NOT need it?
I have found that auto white balance or kelvin for white balance works very closely to the Expodisc in situations where the lighting is even-toned.
For example, I took this shot of my kids in a bedroom with neutral tan walls and indirect natural light coming through the windows. There was no color casts hitting their skin tones. I did a test shot with the Expodisc and one using auto white balance and there was very little difference in color. If you are unsure where there are color casts, do a test shot with and without it to see if it corrects any colors you may not have noticed otherwise.

It is also not needed in direct daytime light or overcast days when the light is flat, even, and there’s no color reflections coming from other sources. If your subject is standing near a red brick wall or someone with a hot pink shirt on then, yes, it’s a good time to use it to eliminate color casts. I’ve also heard it’s not needed in a controlled lighting situation such as studio lighting.
How to use Expodisc
1. Set your meter for proper exposure.
Note: Normally you can set a custom white balance in any of the Manual or Semi-Auto modes, but NOT in auto mode.
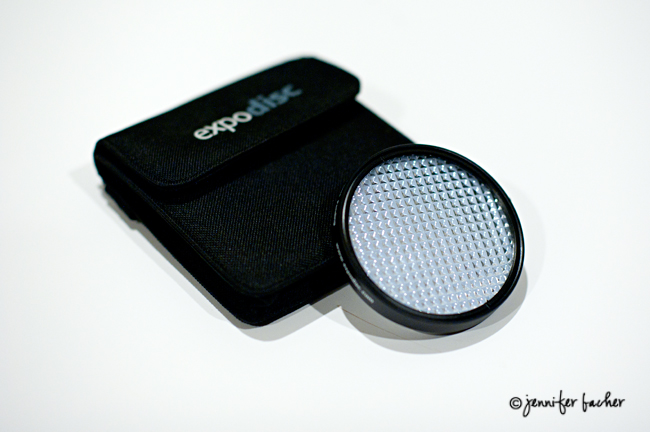
2. Snap the Expodisc on your lens.
It doesn’t screw on like a filter. Just snap it on or hold it up to your lens with the honeycomb side facing outward. Buy the correct size disc that fits your largest lens. You can hold a larger disc over a smaller lens. It doesn’t have to snap on. You can simply hold it flush with the front of your lens.
3. Turn off autofocus so your lens isn’t trying to focus on the Expodisc when metering the light.
If you forget to do this, you will hear your camera struggling to find focus.
4. Follow your camera’s instructions to set custom white balance.
For Nikon:
1.) Hold WB and spin the knob until PRESET or PRE is selected.
2.) Take your finger off the WB button.
3.) Hold down the WB button again for several seconds until PRE blinks.
4.) Release the button again.
5.) While PRE is still blinking, point the camera at your light source.
6.) Press the shutter.
7.) If Good or Gd blinks, you’re done. If NG or No Good blinks, try again from step 3. If it says No Good it usually means it isn’t achieving a proper exposure. That’s why it’s important to point it directly at the light before you click the shutter.
Instructions for Canon and other camera brands and models can be found on the Expodisc website.
For Canon, I believe you place the Expodisc on your lens, click the shutter to get a sample image, then go through your menu to set that image as your reference for custom white balance.
Remember; before clicking the shutter, make sure you point your camera in the direction of the light source illuminating your subject. Stand where your subject is standing and point it toward the light hitting them. If you are indoors, point it directly at the light i.e. ceiling light. Outdoors, directly at the light source hitting your subject. You must also re-meter with your Expodisc every time your lighting changes for more accuracy.
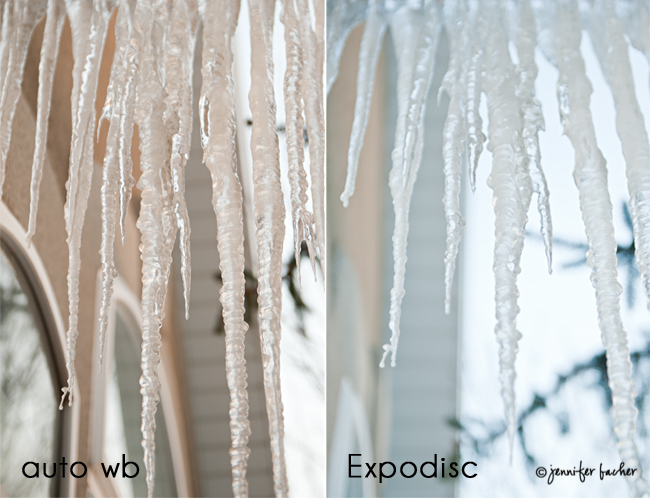
Sample images with Expodisc
The first set of images were taken under tungsten lamp light.

The second set of the icicles were taken outside in evening warm setting sun. I pointed the Expodisc directly at the orange setting sky to neutralize the color of the ice, which made it closer to what my eye interprets as the natural color of ice.
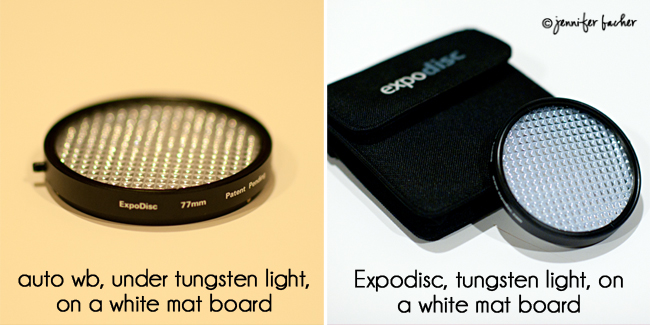
This next set of images of the Expodisc is the reason I love this thing! Take a look at the difference it made in color! Both Expodiscs were shot on a white mat board placed on the floor under orange tungsten light in room with greenish walls. Auto white balance failed miserably in this situation!
Can you believe that yellow background is actually white?
There are two versions of the Expodisc
Neutral is designed to be used in all photographic lighting situations where it is necessary to set a neutral white balance. It is the most versatile of the two filters. It will produce images with white whites and gray grays. This is the one I have and recommend.
The Portrait version is designed specifically with the portrait photographer in mind. It produces a gentle warming effect. I haven’t used the portrait version so I can’t recommend which I like better. I’ve heard a few people say it makes their images too warm, but may differ according to your individual taste.
More information on the Expodisc
For further questions, visit the Q&A section of the Expodisc website.
Also super helpful, this series of five videos by Photographers Zach and Jody Gray. They walk you through all of the benefits of the ExpoDisc and how to use it correctly. They also explain how you can use it to achieve proper exposure in contrasty situations when your meter goes crazy from all the lights and darks i.e. when shooting a bride and groom. I have used it for exposure in situations like this as well and have been very pleased with the results it gave me.
The post How to Use the Expodisc to Perfect Your White Balance appeared first on Click it Up a Notch®.