When Courtney first asked me to write a guest post for “Click it up a Notch” I was really excited and honored! That feeling quickly turned into a giant writers block as I wondered what I could possibly share with so many talented photographers!
But there’s one thing I always come back to when picking out my favorite photos and that’s tack sharp focus. Photoshop can do a lot of amazing things. It can fix up photos with the worst exposure you’ve ever seen, remove unwanted elements, straighten bad horizon lines, and do a thousand more handy tricks. But it cannot take a photo that is out of focus, and make it be in focus. For that reason, I’ve always felt that focus is the most important element to get right in camera.
I am by no means an expert on the subject, but I’ve learned a few tips that I can share.
The most helpful method I’ve discovered is Single Point AF, verses Dynamic Area or Auto Area. (These are the focus options for my Nikon D90—they may be called something different on a Canon, or vary by camera.) In Single Point AF you can move the focus point to the exact part of the photo you want to have the sharpest focus while looking through the viewfinder.
Read more about changing your focal point here.
I learned photography with the “focus and recompose” method. My camera focused on whatever was in the center of frame, so if I wanted a flower to be in focus on the far right of frame, I’d have push the shutter half way to focus on the flower and then recompose the shot to get the flower where I want before taking the picture.
The problem with this method is movement, especially when shooting at wide apertures with shallow depths of field. I found that it was really easy to throw off my focus completely by my small movements and that I risked that outside elements, like wind, could come and move my flower in the time it took me to recompose my shot. With Single Point focus, I can compose the shot how I’d like, and move my focus point to that flower on the right of frame, focus, and complete the shot without having to move.
Read more: Master Depth of Field with 4 Simple Tips
This method has been incredibly helpful to me. (It is my understanding that this only works for Nikon shooters as we have an active focal point. Canon people you still need to meter off the center focal point and then either move your focal point or focus and recompose. Maybe a Canon person can chime in **Check out Melissa’s comments below if you are a Canon user to clear up any confusion** – added by Courtney)
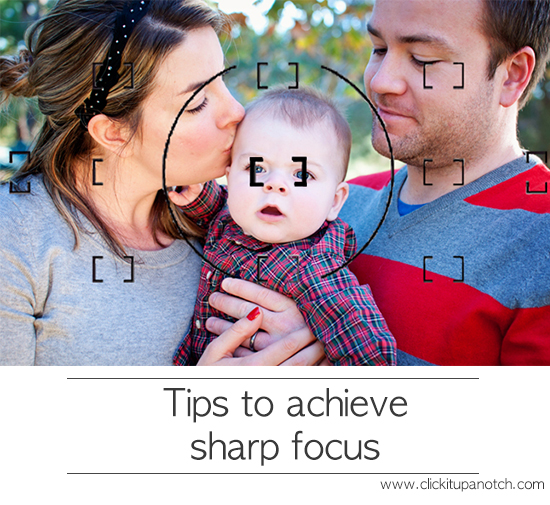
For example, in the shot below, I wanted the sharpest focus to lay on the baby’s face. Since he was in the center of the photo, it was fine leaving my focus point right in the center. I made sure the focal point I selected landed right on his eyes.
Read more: Make Your Blurry Photos Tack Sharp with 6 Simple Tips

The result was tack sharp baby blues.

But some shots aren’t so easy and you don’t want your focus to lie in the center of the frame. In the shot below, I was shooting vertically and her eyes were in the top 1/3 of the photo. I wanted my sharpest point of focus to be on her eyes. So when I turned my camera and looked at her through the viewfinder, I simply moved my focal point towards the top of the frame and centered it right on top of the eye closest to me.

When shooting people you always want their eyes to be tack sharp, and if they’re at an angle, I always want the eye closest to me to be the sharpest part of the photo and so I always place my single point of focus directly on the closest eye. If I had left my focal point in the middle, I would’ve had to tilt my camera up to focus on her eye and then move my camera back down to frame the shot and take the picture. During that time I would risk the possibility of either her or me leaning forward or back just enough to throw focus off completely, and the picture would be lost. No amount of sharpening in Photoshop would make the photo be in focus.
I should also mention that I know a lot of photographers that still use and love the “focus and recompose” method and that Single Point AF is just something that works for me and that I think is worth trying out!
Two other important factors for sharp photos are ISO and Shutter Speed.
Shutter Speed is fairly self-explanatory. The faster the shutter speed, the lower the risk of movement affecting your photos. I used to pride myself on being able to take photos in focus as slow as 1/40 of a second. But the more I shoot, and the pickier I get about focus, the faster I prefer my shutter speed to be. When shooting people, I really prefer to be around 1/125 of a second or faster—and even faster for kids if possible!
Your ISO, as you probably know, can affect grain in your photos. As a general rule, the higher your ISO, the more grain that will be introduced. And grain can detract from that sharp look in your photos. But grain tends to mostly appear in the underexposed parts of your pictures. So while you should start off at the lowest ISO you have, don’t be afraid to bump it up a little to get a proper exposure, if necessary. There will be LESS grain in a properly exposed photo at ISO 400 than there will be in an underexposed photo at ISO 200. So if it’s getting dark, it’s not always the best idea to keep your ISO down and just shoot dark pictures, figuring you can fix it in post. Getting proper exposure in camera can keep your pictures looking sharp!
Ok, so you may have already known that your focal methods, shutter speed, and ISO, can affect your sharp focus. But did you know your Aperture can affect sharpness in your photos as well? And I’m not talking about depth of field. I’ve heard for a long time that every lens has a “sweet spot,” or an aperture where the lens shoots at its sharpest, and I recently decided to put this to the test.
I set my camera up on a tripod and aimed it a page in a book, using a Nikon 50mm 1.8 lens. I took a photo at several different apertures and then blew up the pictures on my computer to see the differences. The results blew me away!

The mid-range apertures all look pretty similar, but to me, my sharpest photos are at f/2.5 and f/7.1. The amount of degradation in the photo at f/1.8 shocked me! I may never shoot at 1.8 again! In the past, I’ve taken landscape shots on tripods all the way at f/22. After seeing the results of this test, I now see I’d be much better off staying around f/7.1 to get the sharpest results possible.
These results may vary by lens. The only way to know the sharpest aperture of your lens is to give this test a try! I highly recommend it!
My last step in making sure my final photos are tack sharp is done on the computer when I’m reviewing my shots from a shoot. When shooting portraits, I go through my photos on Lightroom and zoom in all the way on every single photo and check the focus around the eyes. If the focus isn’t sharp, I won’t edit the photo or pass it on. In the photos below, I had two really cute shots of this adorable baby.

At first glance they may look similar, but when I zoomed in on his eyes I saw that the focus was a little off on the photo on the right. Therefore, this photo was not passed on.

This method can be disheartening at times, because sometimes I really love a photo and I am crushed to see the focus is off, but by doing so all the final photos in my portfolio are crisp and clear and I hope that their sharpness makes them stand out!

*You may also enjoy this post – How to Take a Sharp Photo (added by Courtney)*
![]()
 About the Author: Jaymi McClusky
My name is Jaymi and I blog over at Live, Love, Travel where I share many photography tips and host a weekly link-up called “Tuesday Tips & Pics.” You can also follow me on Facebook, Flickr, or even on Pinterest.
I hope to see you soon!


Thanks for the tips! Not sure of the Nikon lingo either, since I shoot Canon, but Canon users are not limited to focus/recompose only. Canon can also toggle the focus points using single point AF or manual AF. I’m still trying to figure out which method works best for me-hard to say!
Yes, you are right. You can change your focal point but I think you need to meter off your center focal point. Hope you find a method that words best for you :O)
I shoot Canon, and technically, metering and focal points are not related. You are correct though that Canon has several meter modes, Spot (3.5%), Partial (8%), Center-weighted (starts at center and averaged across frame), which each evaluate a portion of the frame starting in the center. I guess what I’m trying to clarify is that metering and focus are two different animals. I know this was confusing to me when I first started out.
Yes, you are right about the metering modes, Spot, Partial, and Center-weighted. I was trying to say that you need to meter (set your SS, ISO, and aperture) by using the center focal point. I’m probably just adding to the confusion but I know Canons and Nikons are different that way :O)
You’ve got it right Courtney. :) It’s so confusing at first. Canon SHOULD have metering and focusing together (in my opinion) but they don’t. I think the thought of focus and recomposing comes from people who shoot with the 5D ii because the only crossed sensor is the middle one and people tend to miss focus on the outer points. But yes we do have the ability to toggle focus points only. Unfortunately we have to come back to the center point to make sure our exposure is correct. This is definitely an area Nikon has one up on Canon. (P.S. I shoot the 5D just in case this comment sounds in favor of Nikon. ;) hehe)
I just love this site!! I’m a canon 7d shooter (hobby mostly) and very new to the AF BUTTON on the back I’m guessing you have to move the focal points around (new to doing this as well) ) glad I found ya
Yes, you can toggle your focus points :) Welcome!
Wow, this is so informative! I never really thought of the perspective that you can fix most anything except focus in Photoshop. I really love the photo of the sharp flower. I have a Canon, so I guess I can’t do the single point focus thing, but I do need to get some practice with “focus and recompose.”
Laura, you can still move your single point of focus but I believe you need to meter off your center focal point. Hope this helps :O)
Laura, Courtney is right in saying that you must meter off the center focal point to get correct exposure. However you can toggle your points for focus to obtain better composition. But just check that center point if you’re unsure of your exposure. I feel that was one of Canon’s pitfalls in their cameras. Here’s hoping the next full frame 5D iii has the ability to meter off the active focal point. It would make things a lot easier. :)
Thanks Melissa for helping us clear this us! Canons confuse me…Go Nikon :O)
Thank you for helping clarify the Canon v Nikon lingo/functions here. I have a Canon question: so if the exposure is only checked at the center focal point, is it best to begin each shot at the center focal point to check exposure and then recompose with composition in mind?
Yes, you will want to meter first with that center point when you take a picture. Whether or not that is your active focal point is up to you. What I do for a session or just shooting around the house, is first do my metering with that point and then start shooting. I keep a close eye if the light changes, whether it’s the sun going behind a cloud at a session or my daughter walking away from a window at home. If that happens I hover my center point back over her to make sure my metering is still correct. Your center focal point does not have to be active in order for it to meter correctly. I also keep an eye on my histogram throughout a shoot. I highly recommend having that active on your preview screen so if you’re unsure you can check it. I hope that answers your question. :)
perfect! thank answered my question exactly :). soooo much to learn! and now to learn about histograms…. thank you!
Have you seen this post about histograms, Rachel?? – http://www.clickitupanotch.com/2010/11/reading-a-histogram/ You can do it!
Thanks, Jaymi!! I too, have a D90 and I have big problems with getting tack sharp photos. It was nice to hear someone share information about focus and have the same camera. You have helped me out so much. Thanks, a million!
Dana, I’m so glad I was able to help! Stop by if you have any questions and I’ll do my best to help!
Love!!!!! Thank you for sharing these tips, I now understand why I’m not getting the sharp pictures I want with my 50mm! I am changing my settings now!!!! Thank you thank you!
Thank you for some wonderful tips! I never knew that about aperture. I’ll be testing my lenses to see where I get the sharpest photos.
I love Jaymi. Her photos are amazing on her blog. I have read her blog for a while.
Another tip to add to her tips about shutter speed and producing sharp images is that a good rule of thumb is to make your shutter speed 1/focal length. So if you are shooting with a 50mm, don’t shot slower than 1/50. If you are at 75mm focal length, don’t shoot slower than 1/75.
Nothing really to set in stone, but a really good guideline to follow. If you still don’t have the proper exposure at that shutter speed, adjust aperture and ISO accordingly. It helps a lot!
Great tips, Jaymi!!!
The pictures were so helpful for me, really allowing what I have read to truly all make sense now in my head!!!! Thank you! Thank you!! We are doing this right now in the CM shooting 101 class:), figuring out our sweet spots and focusing on the eyes!!!
You have nice photos. It really motivates me to make my work good enough. Thank you for sharing this.
Great, great post- Thank you for speaking about this. I often times find I do a whole mini photo session with my kids and become frustrated when the photos that had appeared to be in focus on my screen aren’t so much up close :(
Thanks for the tips!
Fabulous & informative! I know my lenses have a sweet spot- I just need to take the time to test them out to know where that is exactly. I think I will do what Jaymi did with the text as it makes it so obvious.
thanks so much for these wonderful tips!
great advice!
loving your photography!
This is really interesting, You are a very skilled blogger. Ive joined your rss feed and look ahead to in quest of extra of your fantastic post. Additionally, I have shared your website in my social networks!
Jaymi, this is a great post! I wish there was something like this around when I started. :) Lots of trial and error in the beginning. You did a fantastic job explaining some awesome tips!
thanks Melissa! I definitely had a lot of trial and error myself and still have a lot to learn! but I like to try to share what I can!
Great share Jaymi!!
This is such a great article! Thank you for sharing with us…I thought I was crazy that I didn’t really like shooting with my aperture at f/1.8 (I have the same lens), so now I know I’m not! :D However, do you have to manually focus your 50mm? My D60 does not have a focus motor in the body, so I’m a lil SOL with my focusing…I have to get that focused myself which is hard!
The Nikon 50mm 1.8 only auto focuses on certain bodies. I used to shoot with the Nikon D70s and technically it would auto-focus, but it auto-focued really slowly and not that reliably. Now I have a nIkon D90 and it auto-focuses just fine and is my favorite lens for portraits! If you plan on sticking with your D60 for a while, you might want to think about saving up for the 50mm 1.4, which I think runs about $450 on Amazon, and you might be able to sell your 1.8 for $75-$100 on ebay to help put towards it! At least I would have to do that, because I am really bad at manual focusing! My eyes just aren’t good enough!
Just found my way to this blog :)…Another tip I wanted to add was one I just saw AF Point Display (on Canons, sorry I don’t know the Nikon equivalent). When you chimp, it puts a red square on where you focused, so you have instant feedback on whether you focused where you meant to. I just tried this last weekend and it helped me a lot!
Thanks for sharing that!
Great article but.. it is VERSUS not Verses*
hi jaymie thank you very much for sharing
Hi Jaymi,
I also have a D90 with kit lens but struggling to get sharp pictures. Would it be possible for you to share a few NEF files that came out sharp for you? I would love to see whether it is my lens or I am overreacting.
Hey Chand!
Jaymi wrote this guest post for the blog so I don’t know we can get a NEF. If you would like to email a photo I can take a look at it to see if you are having issues with your image. courtney@clickitupanotch .com
Thank you, Courtney, really appreciate it. I will share a few of the pictures I have taken recently.
Just reading this post now and when is saw the results of the aperture test (text pics) i said, ‘WOW’. It is not at all what i expected! I’ve read over and over again that you need to play with your equipment, get to know it etc, but I assumed some basics (like the smaller the aperture the more focus ie f/22 should always have more in focus than say a f/7.1 would)… obviously not! Definately going to try something similiar with my lenses! Thank you for including that piece!
Hello, first of all i really love your website, it’s easyforward and simple!
I want to contribute with my research on Aperture and Focusing.
I’ve recently bought a 5D MkII with f/2.8 L lens, with hope of having super sharp focus and light due to the high aperture. Although the results weren’t being famous, and i found out why:
From what i’ve been reading (http://www.apogeephoto.com/aug2010/bsharp82010.shtml) the sharpness has a “sweet spot” in most lenses (from f/4 to f/8, average values, and that’s why for portrait it’s the best, and always with one AF point on, concentrating full “power” to subject, eyes in most scenes). Which, in case you want more sharpness at 1.8 ou 2.8 you should have even more light into your subject. That means, adjusting ISO ou Shutter Speed, or even better: have more natural light available (using reflectors); or taking using peripheral flash sets. Just a back tip for you, relating to aperture. It’s not easy, and requires some experience.
Thank You
I shoot Canon… wouldn’t AE lock resolve the lack of single point exposure/focus question? i.e. …
(A) Compose on the eyes on the top 1/3 of the picture, press the shutter 1/2 way to engage Auto Exposure and select AE lock. Then re-compose, with the single point focus on the eyes and take the picture.
(B) Alternatively, if you use BBF, you can achieve the same result on Canon without AE lock. 1) Compose as-desired moving the single focus point over the eyes and back-button-focus. Then, since you are free to press the shutter button without re-focusing, 2) place the center point over the eyes, press-and-hold the shutter halfway to expose image, recompose back to step 1, and press the shutter all the way down to take the picture.
Method B would be slightly faster probably – if you’re used to using BBF. Method A would give you the higher accuracy of focus, since there is no step between focus and shutter release.
Correct me if I’m wrong, Courtney.
Thank you so much for chiming in :)
Great post! I have a Canon Mark III – it’s not technically the “center focal point” you use to meter off of though right? I mean the focal point can be anywhere, but you use the center circle to meter (the one that would be around the focal point if it was in the center)? I think it’s just a matter of lables but if you say use the center focal point it might make people think they have to have the focal point IN the center and I don’t think you do?
Hey Holly,
Thank you so much for chiming in and sharing your Canon knowledge :)
Newbie here. So you say you may never shoot at f1.8 BC of your test results, but isn’t that what gives you the most depth of field? How do you make up for that shooting at f7.1?
Mary,
Actually, it’s opposite: f1.8 yields a shallow depth of field. To answer the question that would still remain, however – yes, there is a tradeoff involved. If you want the sharpest possible photo, you’re constrained to not shooting “wide open” (largest aperture, smallest f-stop #). If, on a certain image, your primary goal is the shallowest DOF possible from a given lens, you’ll give up sharpness.
This is why it’s important to ask yourself, “what do I want out of this image?” before you start clicking away. It will help you make these choices before it’s “too late”.
Hey Mary,
I don’t think you need to worry about never shooting at f/1.8. I know I do sometimes but I know that it isn’t my sharpest aperture like Colin said. Play around with your lens. I don’t think you need to go as stopped down as f/7.1 but you may be able to get the look you want with f/3.2 or something like that.
Oh my gosh this just helped me so much! Thank you!
This was so helpful, thank you! I just took a bunch of shots of text like you did, but now I can’t figure out how to get them in a grid format like you have to really see which ones are more clear. Can you help me with that?
That is just a collage she put them in. You can find free ones online or some here – http://clickitupanotch.com/2010/12/126-free-collage-templates-for-pspse-and-lightroom-why-didnt-i-think-of-that-wednesday/
I shoot with a D90 and have a 35mm prime and the kit lens. I want to know how you get more than 3 people tack sharp. I have a hard time getting it just right. Where do you focus on? The middle person’s eyes? The person a third of the way in? Maybe I should use a different lens. I’m looking into the 28-75mm 2.8 (tamron) for family portraits. Any advice you can provide? Thank you so much!
“I’ve taken landscape shots on tripods all the way at f/22. After seeing the results of this test, I now see I’d be much better off staying around f/7.1 to get the sharpest results possible.”
Not a good plan. For landscape you always have to balance diffraction softening/sweet spot with depth of field. You almost always want more depth for landscape. You might want to look into hyperfocal shooting.
“This method can be disheartening at times, because sometimes I really love a photo and I am crushed to see the focus is off, but by doing so all the final photos in my portfolio are crisp and clear and I hope that their sharpness makes them stand out!”
This is also a mistake. There are selective sharpening techniques that can tremendously improve your photos. And it depends on what size you’re going to output or print them as to whether that slight misfocus even matters. I’m not saying you should pass on blurry garbage to your clients but I am saying there are things you can try before discarding a shot. Also do not underestimate that ability of an art filter to salvage a photo. My wife and I made our wedding thank you cards from a photo of us in front of a lighthouse that a friend took, and it was completely out of focus – a dreamy oil painting effect made it just work.
the horror! I JUST made my mind up for canon and bought all canon equipment. I thought I had covered all my bases … Why didn’t I find this sooner
Love these tips! I study your blog a lot. Just noticed today that I can’t right click (like on many photo blogs), but when I regular-click, the link does not open in a new window…so I lose my place. Is there any way you can change it so that links open in a new tab by default? I like clicking on all the links while reading, then reading them on a new tab after I’ve read the one I’m on. Thank you! Feel free to delete this comment..I just wanted to let you know in case you didn’t know w/ the new layout.
Thanks for this great tutorial! My question is this: when shooting close at wide apertures I am always able to nail my focus on the eye. However, when I a distance away, more often than not my subject is soft. Shouldn’t it be the opposite because I have room to work with? Could this be an issue with my lens or myself?
free porn